Source: Guru99.com
Below is a step by step process for Apache NiFi installation
Step 1) Go to the link,
and click “Continue to Subscribe”

Step 2) On the next page,
Click “Accept Terms”

Step 3) You will see this page,
Thank you for subscribing to this product! We are processing your request.

Step 4) Refresh the page after 5 minutes.
Click on “Continue to Configuration”

Step 5) On the next page,
Keep settings default and click “Continue to Launch”

Step 6) On the next page,
Click on Launch. You may need to create a key

Step 7) You will see this success message.
Congratulations! An instance of this software is successfully deployed on EC2!

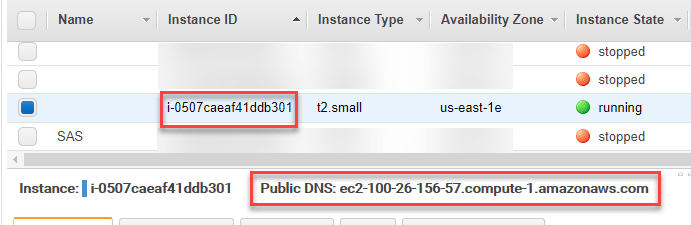
Step 8) Note,
The instance id and the public DNS of the EC2 instance
Step 9) In the security group,
Add all traffic rule to inbound and outbound

Step 10) To access Nifi,
simply use the URL
http://publicdns:808/nifi
In our case it becomes
http://ec2-100-26-156-57.compute-1.amazonaws.com:8080/nifi/
User: admin
Password: Instance Id

Step 11) You will see,
NiFi home screen